Sharing and Searching Metadata Using a ReproPond and the ReproLake
Reproducible neuroimaging principles: 1b: Use pre-exising data, 2c: Annotate data.
Actions: Standards, Annotation and provenance.
Tools: Neurobagel, PyNIDM, ReproLake.
Challenge
While the ultimate goal of reproducible neuroimaging within an experiment set is to obtain and preserve both the data and the associated details (metadata) as an integrated data set, the larger objective is to save and store these integrated data sets in a manner that facilitates fully FAIR data sharing between sites and studies. If data are poorly annotated, if everyone uses their own naming scheme, if data are all stored in different formats and metadata are scattered across different storage devices or investigator’s private drives, it becomes very difficult to find and reuse data, whether that data is private to the lab/project or publicly available. How do the FAIR principles apply? Findable means that PIs and project managers, for example, can find the data, that is, it is annotated and stored in a way that allows search across all metadata. Accessible means that users can easily retrieve the relevant data once found. Interoperable means that the semantics of the metadata are clear and machine-processable so that related items can easily be retrieved and interpreted. Reusable means that the data have enough metadata and provenance recorded that the data can be understood and reused.
Exercise
Here we will learn how to set up a local FAIR metadata store, which is known as a ReproPond in the ReproSystem. We will learn how to add subject-level (meta)data to the ReproPond produced by following the Implementing data management basics: Creating a BIDS Data Dictionary tutorial and learn how to perform queries using a user-friendly user interface (Neurobagel). Because the data and metadata are standards compliant, using BIDS and NIDM respectively, all such ReproPonds can be cross-queried, allowing, for example, multiple sites within a project to share metadata across a set of federated local nodes. We will also show how data can be retrieved from the ReproLake, a semantically aligned store of publicly-available datasets from OpenNeuro and other projects developed and maintained by ReproNim. Researchers can then use the Neurobagel Query tool to search across both ReproPonds and the ReproLake, using criteria like age, diagnosis, and other annotated variables. The query tool allows researchers to download both participant-level and dataset-level results, facilitating the discovery and retrieval of relevant data for cross-study analysis.
Before you start
- Raw data files need to be organized as per the BIDS format (see Converting DICOM to BIDS tutorial)
- A data dictionary that can be used for both BIDS and NIDM compliant representations for ReproPonds and Lake is available (see Implementing data management basics: Creating a BIDS Data Dictionary and Adding Semantics for FAIR
- The ReproPond is built from the nidm.ttl file containing semantically-enhanced subject-level data
- The Neurobagel tools need to be installed. To run the Neurobagel Docker, the Docker service needs to be installed on the host machine (refer https://docs.docker.com/desktop/install/linux/). Also ensure that there is a docker group setup and the current user is a member of the docker and root groups (as per https://docs.docker.com/engine/install/linux-postinstall/):
sudo groupadd docker
sudo usermod -aG docker $USER
sudo usermod -aG root $USER- Make sure you have a working knowledge of git and git installed (see the Git tutorial for more information).
Step by step guide
Step 1: Set up your local ReproPond using Neurobagel
Here we are going to mount your NIDM file (nidm.ttl) containing the study data using Neurobagel to create a local ReproPond.
First we install the Neurobagel Docker. Please refer to https://neurobagel.org/user_guide/getting_started/ for full details.
Start by cloning the Neurobagel recipes:
git clone https://github.com/neurobagel/recipes.gitMake copies of the template configuration files to edit for your deployment (do not edit the templates themselves).
cp template.env .env
cp local_nb_nodes.template.json local_nb_nodes.json
Replace the placeholder value for NB_API_QUERY_URL in the .env file (near line 65) with the address of the machine you are going to deploy Neurobagel on.
NB_API_QUERY_URL=[http://XX.XX.XX.XX](http://XX.XX.XX.XX)If you are deploying Neurobagel for the local computer use: NB_API_QUERY_URL=http://localhost:8080 where :8080 is the default port for the federation API. Please refer to our detailed documentation for a complete overview of configuration options.
NB_API_QUERY_URL=localhost:8080In the terminal window still in the recipes directory launch the docker by entering:
docker compose --profile full_stack up -dRunning the docker services for the first time, there should be a network interface, volume and four container services running.
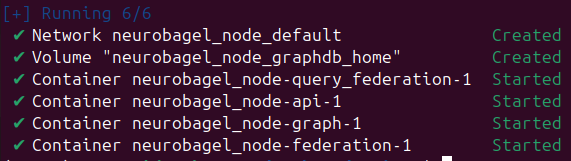
Check that your docker containers have launched correctly by running:
docker psThere should be four docker services running.

To stop the service enter:
docker compose --profile full_stack downFor full details of profiles and environmental variables at https://neurobagel.org/user_guide/config/. For additional information for maintaining a node refer to https://neurobagel.org/user_guide/maintaining/.
Step 2: Add local data and metadata to the local node
Refer to https://neurobagel.org/user_guide/config/.
The neurobagel/recipes repo contains a helper script scripts/add_data_to_graph.sh for automatically uploading all JSONLD and/or TTL files (i.e., graph-ready data) in a directory to a specific graph database. Below is an example of uploading files from a neurobagel_examples directory and clearing the existing data:
./add_data_to_graph.sh PATH/TO/neurobagel_examples/ localhost:7200 repositories/my_db DBUSER DBPASSWORD --clear-datae.g.
./add_data_to_graph.sh uploads/ localhost:7200 repositories/my_db DBUSER DBPASSWORD --clear-dataIf security is not an issue, keep the username and password the same (i.e. DBUSER and DBPASSWORD). Do not change the repository name, leave as repositories/my_db.
The –clear-data flag removes any existing data in the database (if the database is empty, the flag has no effect). You can choose to omit the flag or explicitly specify –no-clear-data (default behavior) to skip this step.
Step 3: Use Neurobagel for cross-study queries
Multiple local nodes (ReproPond) and public nodes (ReproLake).
In a web browser access your own query tool at http://localhost:3000
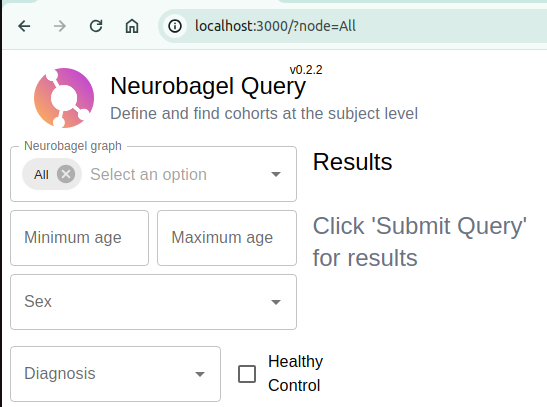
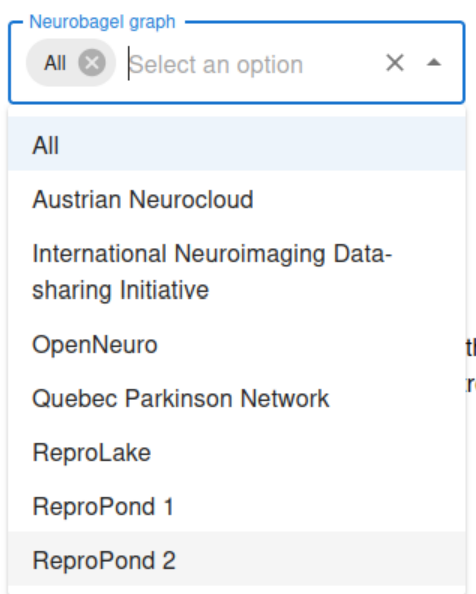
Select between your local, federated nodes and the ReproLake node.
Select other attributes for your query (e.g. age, diagnosis) and click on the Submit Query button.
Select the desired studies and click to Download Participant-Level Results and Dataset-Level Results.
Step 4: Download new data
Create a working directory for your project and place the Participant-Level and Dataset-Level Results TSV files inside.
Open a terminal window in the working directory.
Copy and run the following command:
docker run -t -v $(pwd):/data neurobagel/dataget:latest /data/dataset-level-results.tsv /data/participant-level-results.tsv /data/outputThe downloaded data will be saved in a directory called output in the current directory.